


01
When to Visit
The Himalayas of Nepal are not recommended to visit year-round. This is because it can be too cold during winter, or there can be too much snow during summer. There are two seasons when it’s best to visit the Himalayas of Nepal for photography:
• Spring (March to early June): This season comes right after winter. There can still be large amounts of snow at higher elevations, especially in March. For example, in Namche Bazaar —the town inside Sagarmatha National Park —the average temperature in March is around –4°C. With each month, it increases by roughly 3.5 degrees until July. March is also the clearest month of the season, with the least rain and snowfall.
• Autumn (September to early December): This season is very similar to Spring in terms of temperature. Snow, however, behaves a bit differently. Expect significant snow only at higher elevations (6,000 meters and above), which won’t affect most photographers. Early September still brings plenty of rain and snowfall, but October offers a much better balance of warmer temperatures and stable weather.
02
Difficulties
Weather: clear mornings, cloudy sunsets
The weather can be tough for a landscape photographer in the Himalayas—very tough. It does not have the subtropical climate you can find in the Peruvian Andes. Why is the weather so challenging? Simple: the mornings are too clear, the sunsets too cloudy. Moisture-laden air from the Indian Ocean makes its way to the Himalayas, where clouds form and often move into the mountains around 2 p.m. When they arrive, they arrive in force. Many times the sky has gone from cloudless to completely overcast in just two hours. You cannot shoot during this transition period because the sun is still too high in the sky. Instead, you have to hope for a break near sunset.
Most of the time, clouds begin to clear after sunset. Sometimes it happens earlier, sometimes much later in the night. You need to be ready whenever it does, because when the mountains break through the clouds, the scene can be spectacular. The white peaks (sometimes glowing with color if the sun is still hitting them) emerge against dark blue skies, often with surreal light. It can be breathtaking, but also frustrating if you’ve been waiting many evenings in a row without luck. Sunrises, on the other hand, are usually completely clear.

The lack of foreground objects like flowers and trees
In the Himalayas of Nepal, there are no flowers at the higher elevations. Trees such as pine, hemlock, fir, juniper, and Himalayan birch can be found at lower elevations and in some valleys before reaching the higher plateaus. They can sometimes be used as foreground elements, but it isn’t easy. Only the fir and birch trees grow high enough to be included in a photo with a snow-covered mountain.
The lack of floating water
By flowing water, I mean streams and waterfalls. There is very little flowing water here because much of it drains into the ground beneath the rocky debris left by the glaciers. As a result, very little water makes its way farther down the mountains. Most of the water comes from snowmelt, but there isn't much rainfall.
The altitude makes it more difficult to explore
One of the key factors in finding unique and great photographs is exploring. The longer you do this, the greater your chances of success, the formula is that simple. But because of the high elevation, you won’t be able to explore as much. During my first two weeks in the Himalayas, I found this especially difficult. Instead of feeling the desire to explore, I felt the desire to rest.
Even though you’ll feel fitter later on, keep in mind that you’ll still need to be selective about where you choose to go. If you spot a viewpoint slightly higher up, something that might normally take 20 minutes at high elevations (think of the Dolomites or Iceland)—you should expect it to take 40 to even 60 minutes in the Himalayas, depending on your acclimatization.
A guide is required
It is mandatory to have a guide anywhere in the mountains of Nepal, including the Everest and Kangchenjunga regions. While this is beneficial for the local economy, it can be limiting for a landscape photographer who wants the freedom to explore. If you have already done your research and studied topographic maps, you may feel that a guide is unnecessary and it can be a distraction having someone with you at all times. I write more on this in the last section, so read on!
03
Best Photography Locations in the Himalayas of Nepal
Ama Dablam
The best mountain in Sagarmatha National Park is not the highest mountain in the world - Mt Everest, but the 6,812m high Ama Dablam. This mountain has great photography opportunities from three different angles. The south-west side is the lowest side. Here you have the Imja Khola river. Shooting is mostly around the river. There are good options all along the way. The elevation here is around 3,800 meters, which means the mountain is around 3000 meters higher. You can shoot it both during sunset or moonset from this location.

Ama Dablam at moonset - the west face of the mountain is catching the last moonlight.
At sunrise most of the mountain will remain in the shadow. Another option is to include the moonrise - especially when the conditions during daytime don't cooperate (which often is the case). Ama Dablam looks vertical and has two different peaks. One bigger peak and one lower peak.

Another night photo with the moon in it - now a moonrise.
Another great place to shoot Ama Dablam from is the north-west side. The valley here is much wider compared to the south-west side. The river has more space and is not as powerful – but makes it easier to explore since there are not any parts which block the view. The mountain looks a lot wider and less pointy from this angle. The shape is different with one dominant peak in the middle.
There is more snow and ice visible - which adds some interest to the mountain. The valley sits around 4200 meters high. The best time to shoot is sunset. You can expect to have many clouds around that time. During the five days I have been in this area, I only had one sunset with a view on the mountain. The view came unexpectedly (and was short) after the clouds cleared for a bit well after sunset.

The last area you should definitely explore to shoot the mountain from is the north-east side. When you pass the small village of Dingboche you hike into the area from where Ama Dablam looks totally different (again). It now has three peaks visible. The middle peak is the highest and the other peaks form a symmetrical shape. The middle peak has most of the snow and ice – which looks truly spectacular.

The height is similar to the north-west valley - around 4400 to 4500 meter. The distance to the mountain is much closer - which makes the mountain look bigger. Keep this in mind, you need 15mm or wider. Also keep in mind this valley can have plenty of snow - especially in the months of March, April and December. The river is the place to shoot this mountain from. Other possible locations are higher up the mountain. In case you are in the hiking mood you can try the mountain Pokalde which offers a great view on Ama Dablam and surrounding. Even though you don't have to go to the summit, keep in mind this mountain requires very good hiking and beginner climbing experience.
Gokyo Ri
This peak is located above the Ngozumpa glacier - the longest glacier in Nepal. The area has five different lakes – all named Gokyo lake - from 1 to 5. Gokyo Lake number two is located underneath the Gokyo Ri viewpoint. The view is spectacular and for me this view was the reason to plan my first trip to Nepal back in 2015. The hike is only 600 meters of elevation gain from the village of Gokyo - which makes it relatively easy to visit during sunrise or sunset.
The best time to shoot is during sunset when the last light is catching the mountains. You either have dramatic light here - or no light at all. Since the sunset is the time the area is often filled with clouds. At sunrise the sun is rising in the middle of the frame. But since the mornings are often totally clear and the number of layers are lacking - it isn't the best option.
Keep in mind that the lake is frozen and snow covered until mid May. The best time to shoot the lake is in the fall season (September till November). In spring the lake should be clear on the end of May/beginning of June.
The best photo you can take is a wide panorama which includes the lake on the right (when not snow-covered) a part of the mountains on the right and the glacier itself including Mount Everest on the left. During my visit the lake and the glacier were not visible – but a cloud inversion created alternative dramatic conditions. Because of the lack of interesting subjects like the lake and the glacier - I decided to include other subjects such as the flags and my own footsteps. This is something I would not have done otherwise - it would have made the composition too busy.

Another location in the Gokyo area – is above Gokyo Lake number five. From here you can see the bend of the glaciers – and you can see other smaller glaciers joining the Ngozumpa glacier. The Gokyo lake number five takes even longer to melt since it is on a higher elevation. This shot can be taken during both sunset and sunrise.

The reason this spot works better at sunrise is because the sun has more space and is not blocked by a mountain layer. The mountains Everest, Nuptse and Lhotse are visible - but they look very small and are lost between other mountains which look much bigger. It is all about the wide view here. Don't expect to find great foregrounds. Running water is difficult to find since most melting water goes through the ground.
Thamserku Tree
Thamserku is a 6,623-meter high peak inside the Sagarmatha National Park It is one of the first 6000 meter peaks you see when you start the hike from Namche towards Ama Dablam. When you hike from the village of Phortse towards the north-east (Gokyo-Ri) you will see some trees. They are a little bit off the trail so you have to keep an eye out. You want to aim for a sunset because you need clouds in the valley which will create the separation between the tree and the background with Thamserku above it. The change of these conditions are high at sunset. The sunset light will also hit the mountain on the west-face.

04
Best Areas Kangchenjunga 8,586 m
Ghunsa, above Hill Side Lodge
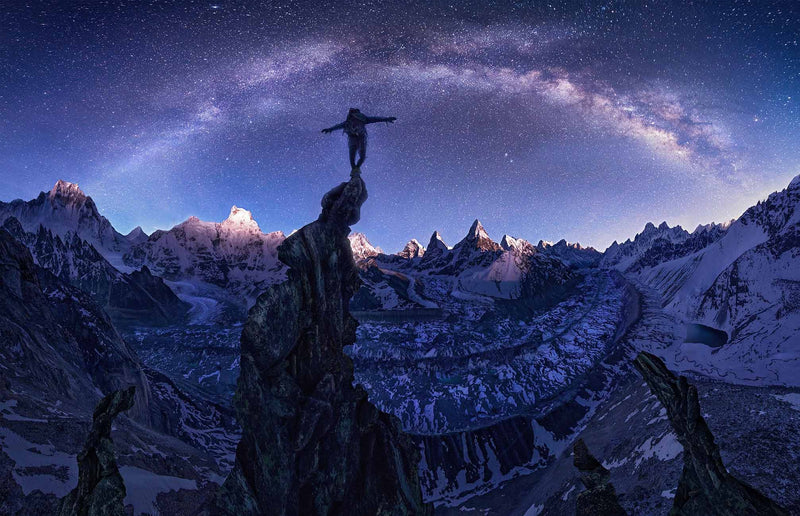
This is a viewpoint inside the Khangchendzonga national park and offers an incredible view towards Makalu and Everest - but only Makalu is visible. A tele-zoom lens should be used. From 80 to 200mm. The view offers a spectacular layer view. The best time to shoot is during sunset when the back-light creates depth between the layers. The number of layers are spectacular - but what is even better are the shapes of the mountain ridges and mountains. The rugged, sharp ridge lines present the highest mountain in view: Makalu. There is no foreground in the form of flowers or trees - a person can add a sense of scale and awe.

You can camp directly underneath the viewpoint – or you can stay in the Hill Side Lodge – which requires you to hike for around 40 min towards the viewpoint. The elevation is 4,600 meters – which means you need to be acclimated before visiting. The hike from the village of Ghunsa takes around 3 to 4 hours. The total elevation gain is 1100 meters
Kangchenjunga Base-camp
There is a small pool near Kangchenjunga base-camp which also allows you to shoot the reflection. The mountain range looks impressive from here. The line-up of the mountain is symmetrical - even though the right side is higher. Even more interesting is that the mountains you see from here is not Kangchenjunga but other neighboring peaks. You can also shoot these peaks with a tele-lens - which makes them look bigger. Including a person for scale can be a good idea since there is no good foreground.

When you hike a bit further – following the valley uphill – there is another mountain you can hike up to which gives you a nice view on the glacier and also on the whole Kangchenjunga range. It requires you to hike from 5100 meter up to 5600 meter. Having a guide with you on a location like this is recommended – which is good news since a guide is now required.
05
Do You Need a Guide?
In 2023 a new rule got enforced which required all foreign hikers to have a licensed guide with them anywhere in the Himalayas. The Khumbu area didn't want to enforce it however - and instead came with a new Trek Card requirement (official name is Khumbu Pasang Lhamu Rural Municipality Entry Permit). This card replaces the other permit you need for all other areas in Nepal - the TIMS card.
In addition to this new Trek Card, you also need a Sagarmatha National Park permit. Don't worry where to get this - you will have to buy one just before entering Namche Bazar area. Either way - the fact you don't need a guide is great news for those landscape photographers who like to do this area on their own. You can get the Trek Card permit at the counter in Lukla . Lukla is the village you arrive at when flying into the area - also known as the most dangerous airport in the world. The price for the Trek Card is around 40 USD (can change each year based on currency fluctuations and inflation).
In case you either need or want a guide, you can get one either through an agency in Kathmandu, or by getting in contact with an independent guide. All guides need to be certified. Independent guides are cheaper and can be found on social media websites like Instagram, Facebook, Reddit etc. It is always recommended to choose one with multiple positive reviews and do some research if the reviews seem legit. The expected price is around 25 to 35 USD a day. Another option is to hire a porter and guide in one. The guide will then also carry your stuff - depending on the weight and number of people. You can of course add more porters. They cost around 15 to 20 USD a day.
06
Can You Fly a Drone?
Yes, when you have the right permits. Getting a permit is difficult and can cost in the 1000's of euros. It is only realistic for commercial companies who need to do filming. My advice is to not bother about it and don't bring your drone.
07
Where to Charge Batteries?
You can bring a solar panel – which will do a great job during most of the day (until around 2 – 3 pm, depending on the month). Another option is to charge them in tea houses and lodges, which you will find almost everywhere along the trail. You have to spend the night there – or ask them to charge it for a fee.
08
Final Thoughts
A trip to the Himalayas of Nepal is as rewarding for landscape photography as it is demanding. Choosing the right season, preparing for challenging conditions, knowing where to find the best viewpoints, and understanding local regulations for guides, drones, and battery charging will all help you make the most of your adventure.
If you're excited by the idea of photographing the Himalayas but are unsure how your body will cope with extreme altitude, it may be worth starting with a high-altitude destination that's easier to acclimatise to, such as Peru. On our Peru photography tour, we gradually acclimatise throughout the trip while reaching elevations of up to 4,600 metres, all while photographing spectacular mountain landscapes. It can be an excellent introduction to high-altitude landscape photography before taking on the greater challenges of the Nepalese Himalayas.




Share your experience, ask a question, or tell us what you would love to photograph.